Developing haptic-enabled application with TanvasTouch SDK is like drawing on a virtual canvas. What do we mean by that? Imagine drawing an image on the screen. We get the texture data from the actual image asset, then we specify the position and width/height of the region that we want to put the image in. And done! With TanvasTouch SDK, you can do the same with haptics too. It is as simple as: you tell us where you want the haptics to be, and we will take care of the rest. Let us take a look at the following example:
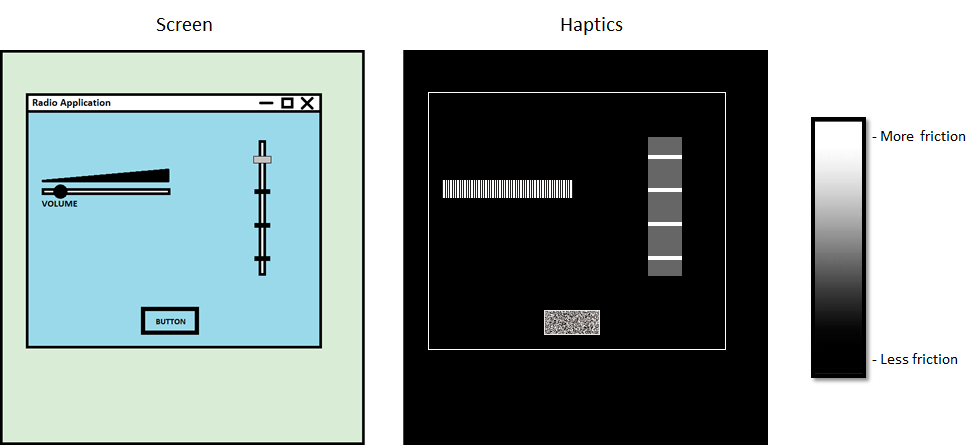
The first diagram shows an application’s graphic user inferface. The second one illustrates the haptic values on the TanvasTouch device that corresponds to the application. In this example, there are five different haptic experiences:
- No friction added when the user is touching outside the application window (black)
- Consistent slightly higher friction when the user touches inside the application window (dark gray)
- Increasing friction from left to right on the continous slider (gradient from black to white)
- Abrupt friction changes on the stepped slider (black with white interruptions)
- Rough texture on the button (high amplitude noise)
To create these experiences, developers need to place the desired haptic media at the right location. TanvasTouch SDK provides two powerful tools for doing this: The TanvasTouch API and the TanvasTouch Engine Dashboard. Our API features a series of haptic resource classes that regulate the process of haptic rendering. And the Dashboard serves as a development tool for visualizing these virtual resource objects.
A haptic resource is an object created by the application developer to communicate an experience to the TanvasTouch Engine. To begin building applications that deliver TanvasTouch surface haptic experiences, it’s critical to understand the function of these resources.